Posts

Boost Graphics Performance: How to Optimize Windows 10/11 GPU Settings for Gaming, Video Editing, and 3D Modeling

Image
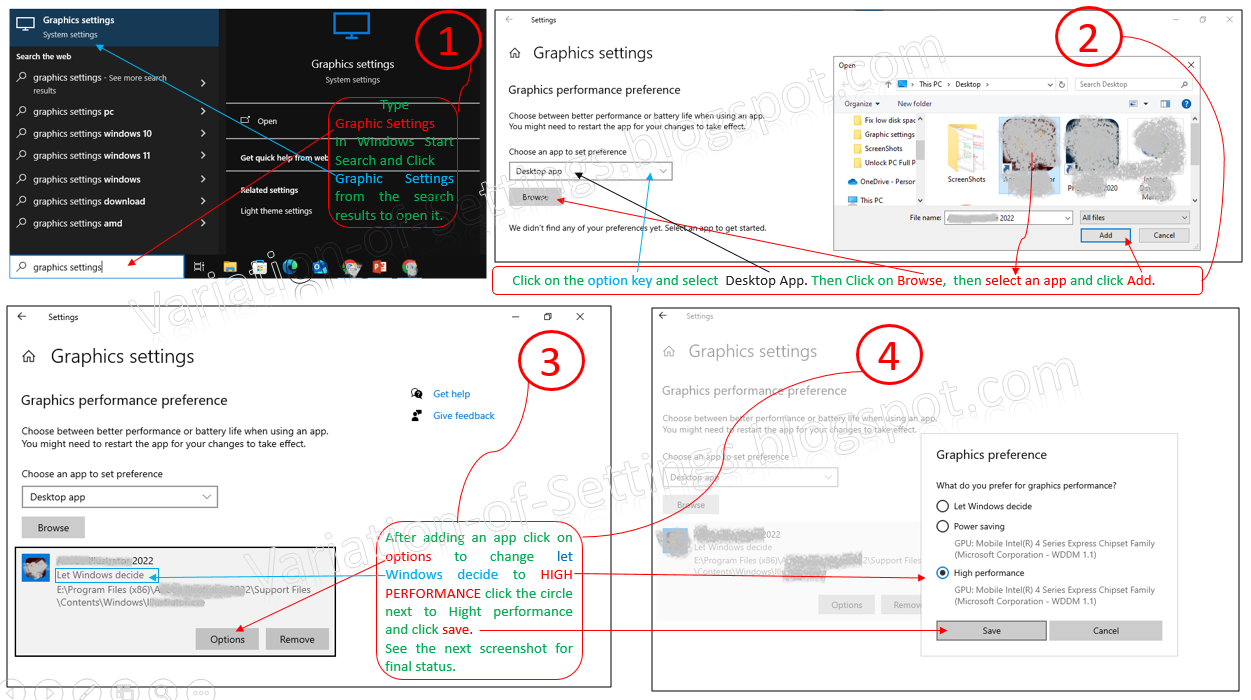
Graphics Optimization Made Easy: A step-by-Step Guide Unlock your computer's full graphics potential by optimizing performance for seamless handling of high-resolution files and resource-intensive applications. Windows 10/11 allows you to tailor graphics processing unit (GPU) settings for individual programs, ensuring optimal performance. To access the Graphics Performance Preference Settings: 1. Type 'graphics settings' in the Start menu search bar. 2. Select the corresponding result to open the settings. Within the Graphics Settings: 1. Click "Choose an app to set preference" and select 'Desktop app.' 2. Click 'Browse' to locate the desired program. 3. Choose the program and click 'Add' to incorporate it into the settings. To allocate optimal GPU resources: 1. Click the added program's icon/name or the "Options" button (if visible). 2. Click "Options" and select the 'High Resolution' or 'High Performanc...

How to Optimize Windows Paging File Size for Better Performance: A Step-by-Step Guide

Image
Turbocharge Your PC: Optimize Windows Paging File Size The operating system uses paging file as if it were RAM. It is the amount of space on the hard disk. It can be managed automatically by Windows or set manually by users. The operating system recommends a size for a page file. However, the user can manually set its size as well. The maximum page file size recommended by computer experts is 1.5 multiplied by the total RAM. For example, if your PC RAM is 4 GB, the maximum page file should be 6 GB (4096x1.5 = 6144). The purpose is for the system to use the page file, whether by Windows to manage it automatically or by a user to set it manually. To optimize virtual memory settings: 1. Type Sysdm.cpl in Run and press Enter. 2. Select Advanced tab > Settings (Performance). 3. Click Advanced tab > Change (Virtual Memory). 4. Choose one of two options: a.   Let Windows manage the paging file size automatically. b.   Set a custom size: select a drive, enter the MBs, ...

How to Speed Up Windows 10/11 by Disabling Animations and Effects?

Image
Make Windows Run Faster by Adjusting Appearance and Performance Settings It contains the visual effects (Animations, shadows effect , smoothness, etc ) that determine how things should look or add beauty to the visual appearance of things on your computer screen. By default, in Windows, almost all of these settings are enabled. However, it slows down the PC in cases where your PC has a smaller amount of RAM.   To customize your system's performance settings, follow these steps: 1. Press Windows + R to open the Run Command. 2. Type "control sysdm.cpl,,3" and press Enter. 3. This will open the System Properties dialog box with the Advanced tab selected, click the "Settings" button in the Performance section. 4. Choose one of the following options:      "Adjust for best performance" for automatic optimization      "Custom" to manually select settings 5. Click "Apply" to save changes. Another way to do this is to type  adjust in the t...

Boost PC Performance: Learn How to Limit Startup Programs in Windows 10/11

Image
How to Enable, Disable, and Manage Windows Startup Programs for Optimal Performance When you turn on your PC, several programs automatically start in the startup process and slow down your computer. However, limiting this process increases PC speed. There may be numerous programs that you don't want to start on auto. So, the best practice is to check which programs should start automatically and which should be turned off or disabled. To carry out these changes, use any of the following procedures to open startup: (a) Press the Control + Alt + Delete keyboard keys at the same time, click the  Task Manager,  and then Click the  Startup  Tab.  Right-click the program you don't want to start automatically from the available list and then click disable, or   Select  it and then click the  disable  button at the bottom of the dialog box. (b) Press  Control + Shift + Esc  and then click the Startup  tab.   The next is a...

Windows Memory Diagnostic: Diagnose and Fix Memory Errors

Image
Unlocking the Power of Windows Memory Diagnostic Windows Memory Diagnostic is a sophisticated tool that scrutinizes your computer's RAM, ensuring seamless system performance. This utility is designed to detect and diagnose memory-related problems, resolving system crashes, freezes, and unpredictable behavior. When to Harness the Power of Windows Memory Diagnostic? Run this diagnostic tool when encountering symptoms like: Frequent system crashes or freezes Random blue screens of death (BSODs) Unpredictable system behavior Application failures or errors These red flags often indicate underlying memory issues. By running Windows Memory Diagnostic, you'll identify and resolve memory-related errors, fortifying system reliability. Unleashing the Benefits Windows Memory Diagnostic offers numerous advantages: Identifies and isolates faulty memory segments Prevents system crashes and freezes Resolves memory-related BSODs Enhances overall system stability and performance Detects memory l...

Fix Disk Errors with CHKDSK: A Comprehensive Guide to Windows Disk Repair

Image
Mastering CHKDSK: Diagnose and Repair Disk Issues for Optimal Windows Performance CHKDSK (Check Disk) is a vital Windows utility that meticulously scans and repairs disk errors, safeguarding data integrity and optimizing system performance by detecting and resolving issues like bad sectors, file system corruption, and cross-linking discrepancies. By proactively running CHKDSK, users can prevent data loss, enhance disk stability, and mitigate risks of system crashes, ultimately ensuring seamless file access, efficient storage utilization, and prolonged disk lifespan – all crucial for maintaining peak Windows system health and security. Running CHKDSK in Command Prompt open Command Prompt as an administrator by searching for "cmd" in the start menu, then right-click on Command Prompt in the search results and select "Run as administrator." After that, type "chkdsk /f /r" and press Enter then reply Y if needed to schedule a disk check for the next restart. Th...

What is Deployment Imaging Servicing and Management (DISM): How You can use it to repair System?

Image
Deployment Imaging Servicing and Management (DISM) Tool   The DISM tool is a powerful Windows utility for repairing and maintaining the system image, ensuring optimal performance and stability. By leveraging DISM, you can effectively address and resolve various issues, including: Corrupted system files and registry entries Damaged or invalid component store entries  Windows Update errors and installation problems System installation issues and performance degradation DISM's advanced repair capabilities help prevent errors, improve overall system performance, and maintain a healthy system image. Running DISM CommandsTo utilize DISM, follow these steps:  1. Open Command Prompt as an administrator 2.  Type: DISM /Online /Cleanup-Image /RestoreHealth  3. Press Enter This command repairs system image corruption, checks for component store errors, and ensures your system remains stable and efficient. Additional DISM Command For a detailed report on system image health...