Windows Memory Diagnostic: Diagnose and Fix Memory Errors

Unlocking the Power of Windows Memory Diagnostic


Windows Memory Diagnostic is a sophisticated tool that scrutinizes your computer's RAM, ensuring seamless system performance. This utility is designed to detect and diagnose memory-related problems, resolving system crashes, freezes, and unpredictable behavior.

When to Harness the Power of Windows Memory Diagnostic?


Run this diagnostic tool when encountering symptoms like:

  • Frequent system crashes or freezes
  • Random blue screens of death (BSODs)
  • Unpredictable system behavior
  • Application failures or errors

These red flags often indicate underlying memory issues. By running Windows Memory Diagnostic, you'll identify and resolve memory-related errors, fortifying system reliability.

Unleashing the Benefits


Windows Memory Diagnostic offers numerous advantages:

  • Identifies and isolates faulty memory segments
  • Prevents system crashes and freezes
  • Resolves memory-related BSODs
  • Enhances overall system stability and performance
  • Detects memory leaks and corruption

By leveraging Windows Memory Diagnostic, you'll repair errors such as:

  • Memory corruption
  • RAM failures
  • Faulty memory modules
  • Driver issues

Exploring Windows Memory Diagnostic Test Options


This powerful tool provides two test options:

1. Standard Test: A default test suite checking for basic memory faults, including memory address issues, data corruption, and read/write errors.

2. Extended Test: A comprehensive test suite featuring advanced memory address testing, cache testing, memory stride testing, data integrity checks, and additional fault-tolerant tests.

How to Run the Test


To check for fault, Type “Windows Memory Diagnostic” in the Start menu and click on Run as administrator.

Type Windows Memory Daignostic in Windows Start, Click on run as an administrator


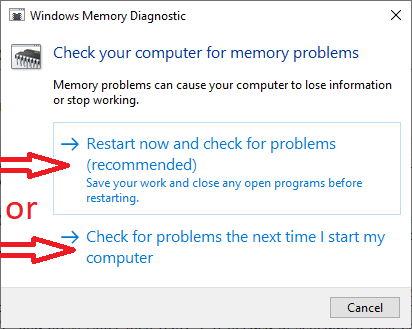
Then Click select  "Restart now and check for problems" this will restart your pc and will Run the dainostic check or select the second otpion check for problems the next I start my computer. Ckeck the confirmation message and click close. This option scheduled the check for the next time when you start your. 


After running Windows Memory Diagnostic as an administrator, Click on Rstart now and check for problems to start the test at once or Click on Check for Problems the next time i restart my Computer.


When you schelduled the Memory Diagnostic Test by click on Check for Problems the next time I restart My Computer then this message is appeared check the confirmation and Click on closed


When you restart system, Windows automatically starts the test; where you can continue as it or can change its mode by clicking the "F1= Options" to change the mode of the test to: Standerd (for a quick test) and extended ( for a complete test). After the completion of test the Windows will displayed the results after log in.

This is Windows Memory Diagnostic Running State If you to change the mode or further customization of the Test click on F1=Options to change the mode from Standard to Extended or further indebth customization


It’ll give your RAM a workout and report any issues. If it finds trouble, consider swapping out that misbehaving RAM module.

Customizing Your Test


Tailor your test with options like:

Test mix: Select specific tests or run the full suite
Number of passes: Specify the number of test runs (default is 2)
Cache enabled/disabled: Choose whether to include cache in the test

By mastering Windows Memory Diagnostic, you'll optimize your computer's RAM, ensuring seamless system performance and reliability.

Pro Tips:

Run Windows Memory Diagnostic regularly to prevent memory-related issues
Use the Extended Test for thorough RAM examination
Disable cache for more accurate test results

Attribution: Screenshots Taken from Microsoft Windows.

Comments

Popular posts from this blog

Unlock Your PC’s Full Potential: Optimize for Maximum Speed and Efficiency

Scan System for Viruses and Malware (How to remove Virus & Malware From System)

How to Install Update on Windows 10: A Detailed Step-by-Step Guide